User:Jef
Table Of Contents
As per Peter's suggestion, bundling Level Control information into wiki pages... looking to break this down into non UDS and UDS.
Page titles:
Level Control, UDS
Level Control, non-UDS
Looking at component info to help people ID or verify what version they have.
non-UDS (legacy):
Component: LUFTFDR.-CDC
Component: J197 LUFTFEDER
Component: - 2C1A1
UDS:
Component: LUFE-DAEMPFER
page title: Level Control, UDS
This information applies to Level Control, UDS versions. This can be identified by evaluating the data in the Auto-Scan:
Address 34: Level Control (J197)       Labels:. 4G0-907-553.clb
   Part No SW: 4G0 907 553 G    HW: 4G0 907 553 F
   Component: LUFE-DAEMPFER H19 0783
- If LUFE-DAEMPFER is not shown in the Component field, this information may not apply.
Re-adapt Adaptive Suspension to default position
Special Notes, warnings, etc
- Do not at any point in time select Basic Settings [IDE01475] Resetting of all adaptations.
- If you choose to do so, DTC B2013: No End-of-Line Programming will be stored and you will need to make an appointment with your local dealer!
- Make sure you perform and save an Auto-Scan before beginning any work.
- If there is an 'incorrectly coded' fault in the [34-Level Control], the controller will need to be coded first.
- If you are attempting to alter the ride height use this procedure at your own risk!
Prerequisites
- Ignition on, engine off. Use a Battery maintainer!!
- Vehicle on level surface
- No persons or gear in Vehicle
- Fuel Tank 60% or more
- Nothing under vehicle
- Doors are to remain shut during the entire procedure
- No faults in the [34-Level Control] controller other than "No or incorrect Basic Settings"
[34-Level Control]
[Security Access-16]
- Enter 201013
[Basic Settings - 04]
- [IDE03804] Deactivating loading mode
[Go!] After the result of Finished Correctly appears click [Stop]
- [IDE03751] Activate level control
[Go!] After the result of Finished Correctly appears click [Stop]
- [IDE03761] Delete calibration for level control
[Go!] After the result of Finished Correctly appears click [Stop]
- [IDE03802] Set reference level
- Vehicle should level itself during this step, may take some time.
[Go!] After the result of Finished Correctly appears click [Stop]
[Go Back]
[Basic Settings - 04]
- For each Basic Setting, click [Go!] After the result of Finished Correctly appears click [Stop]
- Select the Basic Setting steps from the drop down menu in the order shown!!
- [IDE03804] Deactivating loading mode
- [IDE03751] Activate level control
- [IDE03761] Delete calibration for level control
- [IDE03802] Set reference level
- Vehicle should level itself during this step, may take some time.
- [IDE03804] Deactivating loading mode
[Go Back]
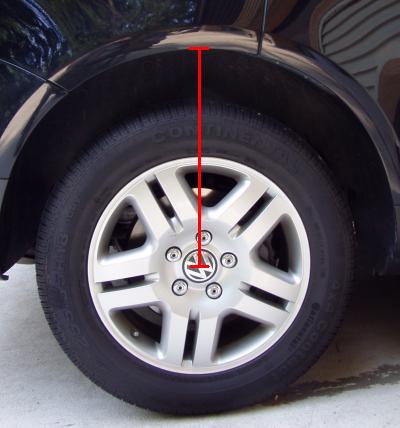
Measure the ride height, in millimeters, from the center of the wheel to the edge of fender, do this for all four wheels and record the values.

[Adaptation - 10]
- Choose from the drop down menu and enter the "New value" recorded value for each of the wheels below, then press [Do it!]
- [IDE02001] Body height left front wheel house edge
- [IDE02002] Body height right front wheel house edge
- [IDE02003] Body height left rear wheel house edge
- [IDE02004] Body height right rear wheel house edge
[Go Back]
[Basic Settings - 04]
- For each Basic Setting, click [Go!] After the result of Finished Correctly appears click [Stop]
- Select the Basic Setting steps from the drop down menu in the order shown!!
- [IDE03762] Calibrate level control
- [IDE03751] Activate level control
[Go Back]
Notes
- This information is from DrPeter's forum post.
- OE Ride Height information can be found on the forum post.
No categories.

