

Level Control (non-UDS)
Table Of Contents
-
1.
Suspension Level Control Calibration
- 1.1.1 Special Notes
-
2.
Bleeding or Charging
- 2.1.4 Special Notes
This information applies to the non UDS Level Control. This can be identified by evaluating the data in the Auto-Scan:
Address 34: Level Control        Labels: 4E0-910-553.clb
   Part No SW: 4E0 910 553 K    HW: 4E0 907 553 H
   Component: LUFTFDR.-CDC    H07 4590
Address 34: Level Control        Labels: 4F0-910-553.clb
   Part No SW: 4F0 910 553 A    HW: 4F0 907 553 A
   Component: J197 LUFTFEDER  H17 0060
- If LUFTFDR.-CDC or J197 LUFTFEDER is not shown in the Component field, this information may not apply.
Suspension Level Control Calibration
Prerequisites
- Engine at idle
- Transmission in park/neutral
- Doors, hood, rear lid or hatch are to remain shut during the entire procedure
[Select]
[34 - Level Control]
[Security Access - 16]
- Enter 31564
[Do It!]
[Adaption - 10]
- Channel 01
[Read]
The vehicle will now try to level itself. The first field will show "Wait". Once this process is complete, the first field will show "Value".
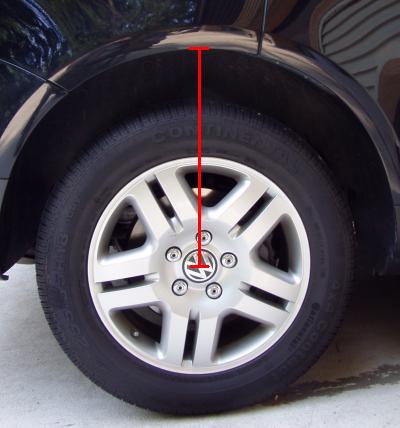
Now measure the ride height, in millimeters, from the center of the wheel to the edge of fender, do this for all four wheels and record the values.
In the "New Value" field for channel 01, input the measurement from the left front wheel.
[Test] - [Save] - Confirm [Yes]
Click the [Up] button to go to Channel 02.
In the "New Value" field for channel 02, input the measurement from the right front wheel.
[Test] - [Save] - Confirm [Yes]
Click the [Up] button to go to Channel 03.
In the "New Value" field for channel 03, input the measurement from the left rear wheel.
[Test] - [Save] - Confirm [Yes]
Click the [Up] button to go to Channel 04.
In the "New Value" field for channel 04, input the measurement from the right rear wheel.
[Test] - [Save] - Confirm [Yes]
Click the [Up] button to go to Channel 05.
In the "New Value" field for channel 05, input a value of 1.
[Test] - [Save] - Confirm [Yes]
[Done, Go Back]
Check for fault codes, if all procedures went fine there should be none.
Special Notes
- In Adaptation channel 01, from "Wait" to "Value" should take less than 5 minutes.
- If you still have the "wait" message after 5 minutes you could have a small leak or a weak pump.
- If you run into issues, verify the level sensors are to factory design.
- Damaged or improperly installed hardware for the level sensors will confuse the system.
- Verify the terminals and wiring for the level sensors are clean.
Ride Height Factory Values
- After a successful Suspension Level Control Calibration, the approximate values should be:
- Audi A6 (4F) (PR-1BK): 386 mm (front) and 384 mm (rear)
- Audi A6 (4F) Allroad (PR-1BY): 388 mm (front) and 380 mm (rear)
- Audi A8 (4E) standard suspension (PR-1BK): 416 mm (front) and 398 mm (rear)
- Audi A8/S8 (4E) sport suspension (PR-2MA/2MB): 396 mm (front) and 378 mm (rear)
- Audi Q7 (4L): 449 mm (front) and 465 mm (rear)
- VW Phaeton (3D) RoW (Rest of World): 407 mm (front) and 401 mm (rear)
- VW Phaeton (3D) NAR (North American Region): 417 mm (front) and 411 (rear)
- VW Touareg (7L) standard: 497 mm (front) and 502 mm (rear)
- VW Touareg (7L) offroad: 488 mm (front) and 498 mm (rear)
Bleeding or Charging
Ross-Tech is not responsible for any damage or problems that may result from following these instructions. They are to be used at your own risk. As always, you should refer to a Factory Repair Manual for your vehicle!
Prerequisites:
- Doors, hood and rear lid closed
- Engine at idle
Note: The bleeding procedure will lower the vehicle, proceed with caution and refer to the factory repair manual for proper repair information, warnings and cautions!
[Select]
[34-Level Control]
[Security Access-16]
Enter 08367
- If the Security Access code does not work, try 08367 in [Coding II - 11]
[Basic Settings-04]
- Bleeding:
- Group 020 = to Bleed Pressure Accumulator
- Group 021 = to Bleed Front Axle
- Group 022 = to Bleed Rear Axle
- Group 020 = to Bleed Pressure Accumulator
- Charging:
- Group 023 = to Charge Pressure Accumulator
- Group 024 = to Charge Front Axle
- Group 025 = to Charge Rear Axle
[Go!]
[ON/OFF/Next]
Field-4 will display the current pressure.
The procedure will time out after 60 seconds.
The procedure maybe repeated as necessary to achieve the desired system pressure.
Special Notes
- These instructions should work with most non-UDS Level Control systems found in:
- A6
- A8
- Q7
- Phaeton
- Touareg
- Bentley Continental.
- http://forums.ross-tech.com/showthread.php?1996-Level-Control-Bleeding-Charging
No categories.